
Embed an Agent in Your Site
Put a live, talking agentic avatar on any web page
Once you have built an agentic avatar, the KonPro widget puts it on your website as a real-time conversational agent. Visitors talk to it out loud and it answers with synchronized voice and lipsync video — no downloads, no plugins, and no separate app to open. It is the same avatar you configured in the studio, now embedded wherever your customers already are.
Install it from npm for vanilla JS or React, or drop in a single script tag from the CDN. Either way it handles the microphone, the streaming connection, and the entire on-screen interface for you, so a working embed is roughly ten lines. Beyond the basics it can show images, videos, 360° panoramas, virtual tours, and interactive maps whenever your agent decides they would help the conversation.
Key Highlights
- • Add a live voice-and-video agent via npm (vanilla JS or React) or one CDN script tag
- • Mount it inline, float it in a corner, or use the bubble launcher that expands on click
- • Works for websites, kiosks, exhibition screens, and installed PWAs
- • Run it with video, or audio-only — as your default, or a switcher the guest controls
- • Show or hide every piece of on-screen chrome to match your product
- • Your agent can present media, panoramas, tours, and maps mid-conversation
- • Configure the agent in KonPro Studio, or automate it through the API and SDK
What It Looks Like
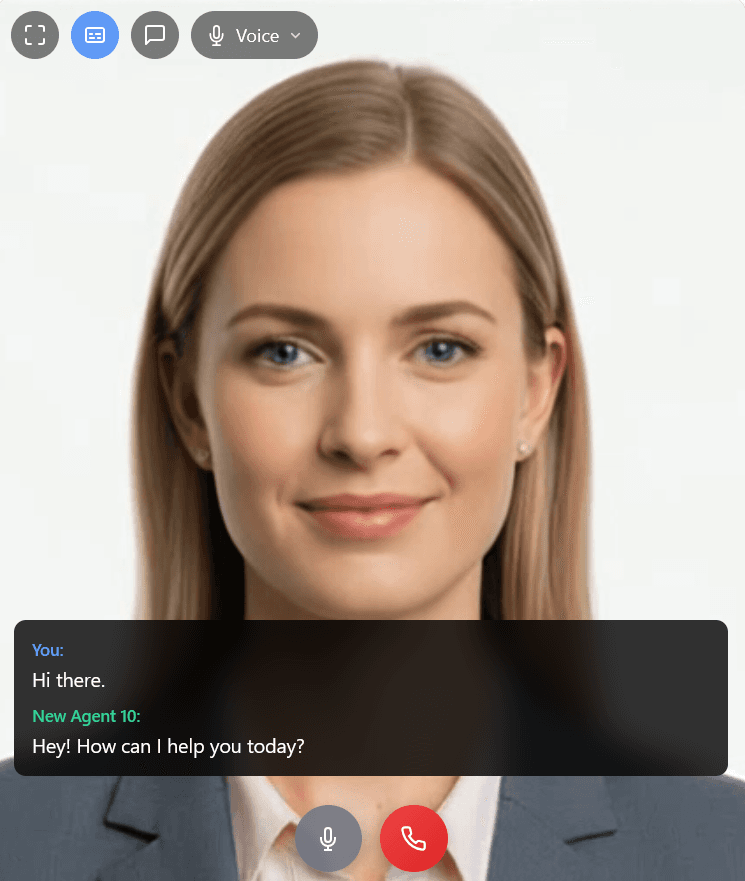
An embedded agent mid-conversation. The buttons across the top switch fullscreen, captions, and typed input, and let the guest choose between always-listening voice and push-to-talk. The transcript sits across the bottom of the stage, with the mic-mute and end-call buttons below it.
How It Works
- Build your agent. Create the avatar, give it a voice, and set up its persona, knowledge, and tools in KonPro Studio. Copy its agentic avatar ID when you are done.
- Add a session endpoint to your backend. The widget needs a short-lived session token to connect. Your server exchanges your API key for one using the Create Widget Session endpoint, so the key never reaches the browser.
- Drop the widget on the page. Install the package or load the script, then point the widget at your session endpoint — the avatar comes back with the session, so you do not need to name it again on the front end.
Never put your API key in front-end code. The widget does support an apiKey option, but it exposes your credentials to anyone who views the page source — keep it for local prototyping only and use session tokens everywhere else.
The Embed Code
Pick whichever fits your stack. All three run the same engine and accept the same configuration.
Script tag (no build step)
A container, the script, and one call — that is the whole thing.
<div id="konpro-avatar" style="width:400px;height:600px"></div>
<script src="https://cdn.konpro.ai/widget/index.min.js"></script>
<script>
  KonproWidget.init({
    sessionEndpoint: '/api/widget-session',
    containerId: 'konpro-avatar',
  });
</script>
npm (vanilla JS)
For projects with a build step. Ships ESM, CJS and TypeScript types, and is safe to import under SSR.
npm install @konpro/widget

// ---

import { init } from '@konpro/widget';

const widget = init({
  sessionEndpoint: '/api/widget-session',
  containerId: 'konpro-avatar',
});
npm (React)
Components instead of imperative calls. React and react-dom 17+ are peer dependencies.
npm install @konpro/widget-react

// ---

import { KonproWidget, KonproBubble } from '@konpro/widget-react';

// Inline — fills whatever box you give it.
<div style={{ width: 360, height: 480 }}>
  <KonproWidget config={{ sessionEndpoint: '/api/widget-session' }} />
</div>

// Or a floating launcher that expands into the widget.
<KonproBubble
  config={{ sessionEndpoint: '/api/widget-session' }}
  bubble={{ label: 'Talk to us' }}
/>
Drop the containerId line and the widget floats over your page in the bottom-right corner instead of filling an element.
Customizing Your Agent
There are two ways to shape what your agent knows, says, and shows — a visual one and a programmatic one. Both drive the same avatar, so you can start in the studio and automate later without rebuilding anything.
In KonPro Studio
Visit studio.konpro.ai to build and tune your agent visually — no code required:
- Pick a public avatar or upload your own under My Avatars, and assign a stock or cloned voice
- Write the persona and prompt that set its tone, scope, and behavior
- Attach a knowledge base so it answers from your own content
- Fill the Display Library with the images and videos it can show while it talks
- Enable tools such as panoramas, virtual tours, city maps, and the kiosk menu on the Tools tab
Through the API and SDK
Everything the studio does is also reachable programmatically, which is what you want for provisioning agents per customer, per tenant, or per campaign:
- Create and manage avatars and sessions from your own backend with the KonPro API
- Set session limits and lock the agent to specific domains via Create Widget Session settings
- Build custom front ends with the KonPro JS SDK when the widget is not the shape you need
- Theme the widget, hide any control, and switch conversation modes through the config you pass to
init() - Hook the widget's callbacks into your analytics or business logic to capture what was said on both sides
Placement Options
- Floating: the agent hovers in a corner of the page, like a support bubble. This is the default when you omit a container.
- Inline: the agent fills a container element you position and size yourself — good for a dedicated "talk to us" section or a landing page hero.
- Bubble launcher: a circular button docked to a corner that expands into the agent when clicked, and collapses again when closed. The microphone is never touched until the guest presses call.
- Kiosk or exhibition screen: run it portrait and full-bleed with push-to-talk, so a held button rather than open-mic listening decides when the agent hears someone. Much more reliable in a noisy hall.
- Installed PWA: the widget detects standalone mode and adapts its fullscreen behavior automatically, which covers kiosk hardware and home-screen installs.
Let an Agent Build It
If you work with a coding agent — Claude Code, Cursor, Codex, Copilot, Gemini CLI, opencode — install the Konpro Agent Skills and it can wire up both halves of the integration for you: the embed on the page and the session endpoint on your server.
npx skills add koninfotech/konpro-skillsThen ask for what you want — "Add an interactive avatar to our support page" — and the agent has the setup steps, the endpoint contract, and the common failure modes already loaded. There are two skills: one for provisioning an avatar and credentials, one for the integration itself. See github.com/koninfotech/konpro-skills, or the Widget Integration reference for what each one covers.
Before You Go Live
- Serve the page over HTTPS — browsers only grant microphone access on secure origins, though localhost works while developing.
- Allow the microphone in your Permissions Policy header. If it is blocked, the mic request fails silently and the guest is left staring at a loading state with nothing in the console.
- If your site sends a strict Content Security Policy, allowlist the widget's origins, or the bundle and its voice-detection dependencies will be refused.
- Restrict sessions to your own domains using the
allowed_domainssetting so nobody can lift your embed onto another site. - Embedding inside an iframe? It needs
allow="microphone", and the parent page must permit it too.
Next Steps
The Widget Integration reference covers the full picture: every config option, the three authentication methods with backend examples, all the tools and UI controls, the React pattern, instance methods, CSP and Permissions Policy headers, and troubleshooting.
For session handling specifically, see Create Widget Session, Get Widget Session, and Delete Widget Session.